Third Party Press

Remilitarization of dot44 and byf43 with zf41 base

Hudson

Well-known member
Thought I would make one thread for my two sporter remilitarization projects I will be posting pictures and questions as I go.

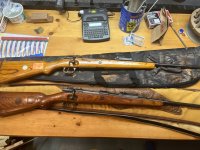
I previously purchased two k98 sporters at auction.

A2D48318-8B27-4C67-ADD7-61DE7BBC0E6C.jpeg
AE89D17E-7C7D-463D-93F5-EFFE9F31CC69.jpeg
6484633C-9ACC-427E-8F6A-ED31C1368205.jpeg
42435EC8-1628-45F2-A812-7A067B5ECDE3.jpeg
I bid on these because while the stocks had been thoroughly modified the metal appeared relatively untouched. The dot44 is matching at least everything that is still there (no bands etc). The byf43 is mismatch bolt.

I would go on to notice that the handguard retaining lip had been clipped from the front of both rear site bases, particularly frustrating for the zf41 base. But I have already replaced the standard rear site base on the dot44 and have a plan in mind for some tricky tig welding to salvage the zf41 base.

20BF8172-9F7D-4985-9BC3-C0408339BE30.jpeg

DBAC96A5-6E5C-49BB-807A-CC78CC97E2ED.jpeg
2025F47C-AEB1-4120-AF94-8534BC2D8E97.jpeg

With careful work isolating the map gas torch to just the site bases heat them to release solder for removal after first removing their centering screws I was able to get the dot 44 sight bases off and replace the rear with one that still had its handguard rim. Lot of oil spiting/spoting in tha last photo but after rubbed down with some gun oil the original finish appears unaffected by the process. I did not add much solder to either base, the old solder seems to be enough for a firm seating.

I now have the dot 44 in a yugo surplus stock as a place keeper. The byf43 is sitting in the safe with no sights on it awaiting me to repair the zf41 rear sight base.
81D6836C-2D00-40D6-B79A-15D0071D49AF.jpeg
 
I now have acquired two late war laminated stocks from a board member here. An e/1 stock that I intend to put the dot44 in and a waa135 for the byf43.

The e/1 will require some repair. There seems to be about 1/32 set back in the wood immediately behind the recoil lug. The seller had placed a thin shim behind the lug to move it forward.

AE5C2C2C-59D3-412B-981C-7ACE812C0ADE.jpeg

D36F72AD-4475-4687-AF40-14DAC5898AD6.jpeg5D2A899F-DE48-412E-BD59-6E87D58FE08D.jpeg405529EB-740E-4803-BF4E-4901DFC21545.jpeg
 
Last edited:
I have experience with acraglass doing basic bedding and repairing cracked toes in other rifle stocks. My tentative plan for this repair is to remove the lug cross bolt and lug. See if that makes that chipped wood become loose. Fill the holes in the recoil nut with clay and coat with acraglass release to use this to mold acraglass that I put into the holes in the side of the stock to fill where the bolt nut and head pushed back into the stock.
549F9FC3-5AE2-43AF-B476-2C68C5CCAC33.jpeg8702BBD9-DA05-487D-94B7-A5ADDD56A2E7.jpeg
 
If the chipped wood is loose I plan to use acraglass to reinstall it pushing it forward to an abut the recoil lug which I will temporarily reinstall with acraglass release.

What I have seen in the one or two other posts I have found about this repair is that people then relieve some of the wood immediate behind the recoil lug and again using acraglass release on the lug fill a 1/8-1/4 thick strip behind the lug with acraglass. I am not sure if this is necessary or not.

2AD627A1-7688-44B7-94FD-87BE2DD62AEE.jpeg

If my wood chip does not come loose after I initially remove the lug I am reluctant to use significant persuasion to get it loose and may just fill the shimmed space and the bolt head/nut spaces with acraglass. The recoil load needs carried by the sides primarily anyways.
 
I am on to another project for the moment (cetme building) but hope to add to this thread over the winter.
 
If the chipped wood is loose I plan to use acraglass to reinstall it pushing it forward to an abut the recoil lug which I will temporarily reinstall with acraglass release.

What I have seen in the one or two other posts I have found about this repair is that people then relieve some of the wood immediate behind the recoil lug and again using acraglass release on the lug fill a 1/8-1/4 thick strip behind the lug with acraglass. I am not sure if this is necessary or not.

View attachment 327581

If my wood chip does not come loose after I initially remove the lug I am reluctant to use significant persuasion to get it loose and may just fill the shimmed space and the bolt head/nut spaces with acraglass. The recoil load needs carried by the sides primarily anyways.
Great thread, & good pix. Please continue when you can, this topic may heip quite a few folks here.
The loose piece does need to be immobilized, by glue, by dowel, something. Jerry Kuhnhausen’s book “The Mauser Bolt Actions, a shop manual” has a pic of the lug area repaired. (an excellent resource)

love the pic showing the repaired vise!
 
Ha ha Waste not want not.

Thanks for your input. Right now that wood piece is firmly stuck, hopefully it becomes loose when I take the cross bolt out and then yes would plan to acraglass. I hesitate to put fasteners through it as I think would just lead to more splitting of the thin segments of lamination in such a small piece.
 
Agreed about screws, or threaded rods. user Old Colt did a similar repair using a dowel vertically through the puck, has held up so far. I believe this failure is due to a combination of being old laminate, old glues and just the grain structure of beech. I have several stocks like this. I’ve glued/epoxied 2 pucks in place, haven’t routed out & acraglassed them as yet. The shim idea is a fool’s errand; once you could shim it, the piece is already loose & will keep moving rearwards, placing more stress on the stock sides, creating those oval holes for the head & nut……..
it seems like every stock I buy on ebay, & some I’ve bought here, have this flaw. (most often not revealed prior to sale). I think some ebay sellers may not know better, IMO, anyone here who knowingly sells a stock w/ this flaw without revealing that & without a proper price adjustment belongs on the “naughty list”.

You know who you are. 🤬
 
Well I took some time this morning off to do my taxes so…. I’m procrastinating and posting an update:

I have repaired the stock that I will be putting the dot 44 in.

8EB43A4C-9332-4AB8-AF42-41AD4F876B8E.jpeg
Here is the culprit. The wood immediately behind the lug had cracked on the laminations where I am pointing with the rods. Prior owner had tried to shim the lug forward.

728BF0C6-837E-4082-B830-C1B73F4B7C2D.jpeg
Looking up from the bottom you can see the wood pushing into the mag well a little
Less than 1/16 inch.
AA0AAEC5-626D-4939-8836-F7593A7D3D8B.jpeg
The holes for the heads of the lug are getting elongated towards the rear.
 
Last edited:
I pulled the lug. The broken segment of wood was still mechanically locked by surrounding wood and only moved back and forth less than 1/16 inch. I elected to not try and blast the piece out. Instead I pushed the broken piece forward to its original position and drilled two 3/64 holes starting near the center of broke piece at a transverse angle so the hole would just intersect the corner of the cracked piece at the lamination. These small holes allowed me to pressure fit an 18 gauge angiocath into the holes and using a small syringe and original titebond aliphatic glue diluted with 1/2 part water injected this through the holes into the crack until I got glue squeeze out from the entire length of crack in the lug recess and the mag well.

7D6EDD4C-BAD3-46C5-B6A0-550B8E4A5567.jpeg

3F95CCEA-72BC-4B17-B4B5-E46BA1361258.jpeg

Before clamping I first placed a small amount of polyurethane glue at the orifice of my two holes and pumped it in with a toothpick. This is probably overkill but I like polyurethane glues ability to creep into cracks. After ensuring the wood was pushed forward it was clamped.

E67C6C11-B51A-4DB6-AFC3-6D69874BB80B.jpeg
 
Once dry, In two steps I then refit the lug and bedded it with acraglass. The entire transverse surface of the wood behind the lug was bedded with a thin layer and more importantly where the heads of the lug and the nut sit that had been pushed back were bedded. Of course used release agent. Again utilized a tooth pick to push the lug to its most forward position will the bedding cured.

1B037063-8973-42FD-AA9A-091321BBB39F.jpeg

BFDB10DF-1AE0-4692-B862-74C26C68231C.jpeg
 
Looks like nice work. Hope you are thoroughly pleased with results. Nice to see them brought back. Thanks for sharing the work and results.
 
I used a modified handguard ring from a Swedish Mauser. Profiled it to the shape of the K98 retaining lip and reattached that to a K98 sight base. Easy way to make a restoration….
 
Moving on to the byf 43 with the zf41 rear base that had its hand guard lip trimmed off. I am working on restoring its lip. The work remains in progress and while it’s risky to show how the sausage is made, especially when I don’t have the finished sausage to prove it tastes good, I thought I’d post some progress pics.

The second photo in this thread shows the starting point the zf41 base with its handguard lip clipped off. I removed the base from the rifle. I then trimmed the forward edge of the rear sight base flush and flat to the level of the sight ears (after first practicing on the other ruined base left over from the dot 44 pictured below.

784C9128-BFB7-4A69-8C2A-F5B315EEF737.jpeg
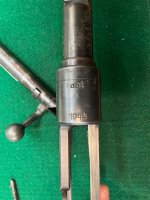
The next photo shows the zf41 base trimmed back to the sight ears on left, my practice run on the one from the dot 44 on the right. I’m the foreground is a lip in the white. After taking a replacement rear sight base acquired from sarco (I think these are repros arrive in the white no markings) I cut the sight ears off and used a parting tool on the lathe to cut it flush at true level of front edge of the sight ears.
5E323DB6-B831-4295-BA82-9F9A84FF302D.jpeg

You can probably guess where this is going. The thought is leaving a ring of metal attached to the lip that will go around the barrel will offer additional stability than just trying to tack the lip on alone.

Dry fit
6CA10BD2-8856-4AA4-A18E-D1BB74EDE2B7.jpeg
 

Military Rifle Journal
Back
Top