How to dissemble WW1/ interwar optics Updated 29-8-22

Stopper

Active member
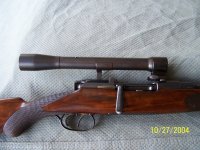
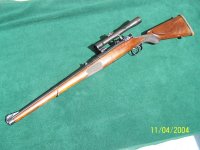
So I have this Bubba Special k98k with holes already drilled and tapped for scope mounts and stock cut shorter. While I could just pop a replacement stock on, I need a period looking scope to go with it as well.

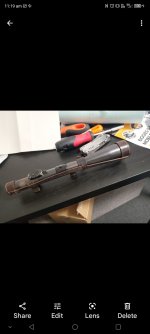
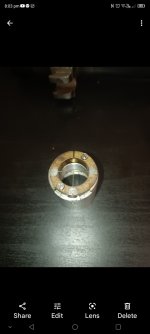
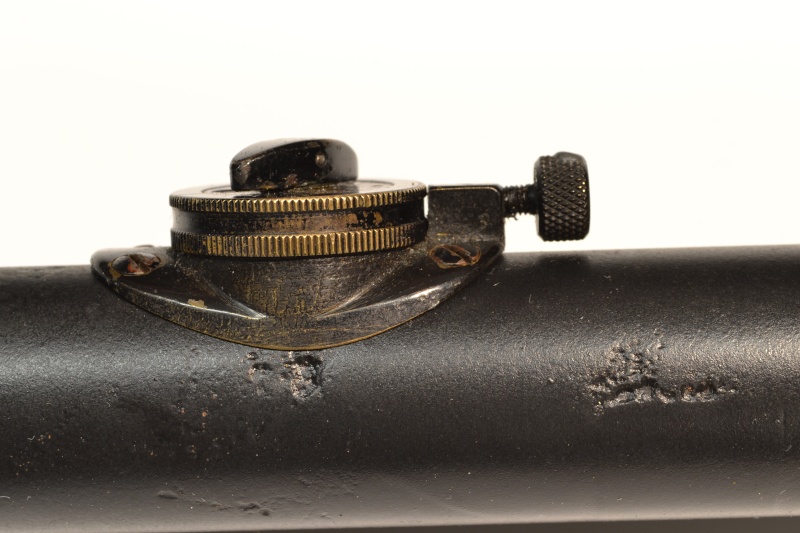
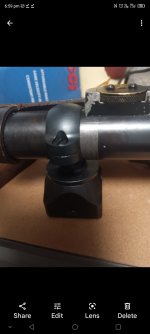
I have a Helios 2 2/1 that would look the part (ok ok it is too early but at least looks more decent than modern scope) but I need to get double claw half rings off before I could mount it. I am well aware the rings were soldered on and scope must be stripped to before de-soldering with heat. I just could figure out who to get the adjustment knob off, I removed the screws the popped the dail off now I am getting nervous, not sure what to do once I remove the two screws holding the elevation adjustment housing off, does the whole middle section just slide out of the tube

I have seen instructions on how to strip ZF39 but they don't have focus adjustment in the middle of the tube like the older ones . Are there anything to watch out for? Any nasty surprise that I have to watch out for?
. Help with how to strip the scope would be much appreciated.
 
I taped the scope on my Mauser to check eye relief and spacing (focus sliding thingie may be in the way) looks like it has to be turret mount, SSR and LSR won't work. And no I am not trying to shoot my cat, he likes to come look every time I work on firearms for some reason .....
 

Attachments

  • Screenshot_20220818_111930.jpg
    Screenshot_20220818_111930.jpg
    406.7 KB · Views: 24
Ok don’t panic. Take it slow. The diagonal slot for your focus adjuster towards the rear of the scope. Stick the screw back in the hole. Work it side to side (even put a couple drops of oil in the slot. That brass lens assembly comes out to the rear. Remove the screw when it’s loose. Stick your finger up inside the rear and work the assembly out the back.
Take the last 2 screws out from under the where elevation knob was removed. That will allow you to remove that block. Beneath that you should be able to lift out and remove the reticle assembly. Be very careful of the reticle.
I cannot see from your pictures what holds the front lense assembly in. Mine had a ring with 2 slots. I used a grinder and a hacksaw blade and made my own spanner to fit the slots and turned the spanner with Vice grips. This should empty the tube. Take it slow. Take pictures of the orientation of parts as you remove them.
If the scope tube has any dents, even little ones it can make inner assemblies hard to remove.
I did a project several years ago where I had to move the rear mount to fit a scope to a different rifle. My scope tube was 2 piece. Yours appear one piece but similar construction. I applied rust blue once completed.
In my ham fisted disassembly efforts, I broke the reticle wire. I purchased .0005 tungsten wire from EBay. It was so thin, it could almost not be seen with the naked eye. Ultimately the project turned out very well and works perfectly. Take your time. Adapt and overcome.
 

Attachments

  • 78C38570-558B-447A-A3FD-3AC98ACFC877.jpeg
    78C38570-558B-447A-A3FD-3AC98ACFC877.jpeg
    311.5 KB · Views: 24
  • C676D56E-3B0C-4410-92EF-963B176B77BC.jpeg
    C676D56E-3B0C-4410-92EF-963B176B77BC.jpeg
    454.6 KB · Views: 25
  • C562E015-B68E-4665-8CA2-62C07599E641.jpeg
    C562E015-B68E-4665-8CA2-62C07599E641.jpeg
    476 KB · Views: 25
Last edited:
Thank you for the heads up. I will give it a go. I should have thought of saw blades! I bought a steel ruler just to be grinded thin enough to fit the slots. I

Also bought a set of cheap screw drivers so that I could file them to fit the screw slots proper (you may be able to see the screw driver surfaces were all in the white).

Yes I too am scared of breaking the post reticle. If it were cross hair I guess it would be easier to replace. By the way, the post is way thick, If break it, I don't think I am capable of making one unless I get some to laser cut one for me, and to line the post up properly.... I am already sweating thinking of it

Okay take my time, slow is smooth, smooth is fast....

Screenshot_20220818_124554.jpg
 
This is my K98k, it is actually an Israeli conversion that I picked up cheap for spare parts, what a pity, Brno codes were relatively rare.... Not only did Bubba drill and taped the action, 7.62 stamp was poorly filed off and the area where the stripper clips go is missing a whole chunk of steel. That is not my pic but I actually stumbled across the ex owner's thread else where and I didn't want to open the safe just to take a photo (I have to fend off my cat everytime I open the safe, he likes to chill next to my rifles for some reason) in case anyone thinks I knocked off someone's pic.

Screenshot_20220818_143331~2.jpgScreenshot_20220818_143608~4.jpg


I was expecting a parts gun but when I got it, I realised that the bore and crown were mint. It would be a shame to strip it for parts

Under the cheap black paint, most of the Israeli parkerise finish is still intact so I just have to parkerise the action once the barrel is removed for drilling and tapping new turret mount.

Stock will be new red glue laminate from Poland (going for $340 USD shipped on eBay now). Again, not my pic, I am waiting for to arrive


Screenshot_20220818_143945~2.jpg


I have noticed Vector Optics now sells repro mounts and their cheap scopes are at least reliable. So I ordered a set for $140 USD shipped just go try. They may be RSM mount rebranded but I sure hope it is as reliable as Vector scope.

Screenshot_20220818_150748.jpg


The gun was $350 and scope 250ish (don't remember), $50 to drill and tap (I could DIY but elect not to this time). I may have burnt more than twice of the value of the gun but for around $1.1k, I should get a decent snipe cone.
 
Last edited:
Ok don’t panic. Take it slow. The diagonal slot for your focus adjuster towards the rear of the scope. Stick the screw back in the hole. Work it side to side (even put a couple drops of oil in the slot. That brass lens assembly comes out to the rear. Remove the screw when it’s loose. Stick your finger up inside the rear and work the assembly out the back.
Take the last 2 screws out from under the where elevation knob was removed. That will allow you to remove that block. Beneath that you should be able to lift out and remove the reticle assembly. Be very careful of the reticle.
I cannot see from your pictures what holds the front lense assembly in. Mine had a ring with 2 slots. I used a grinder and a hacksaw blade and made my own spanner to fit the slots and turned the spanner with Vice grips. This should empty the tube. Take it slow. Take pictures of the orientation of parts as you remove them.
If the scope tube has any dents, even little ones it can make inner assemblies hard to remove.
I did a project several years ago where I had to move the rear mount to fit a scope to a different rifle. My scope tube was 2 piece. Yours appear one piece but similar construction. I applied rust blue once completed.
In my ham fisted disassembly efforts, I broke the reticle wire. I purchased .0005 tungsten wire from EBay. It was so thin, it could almost not be seen with the naked eye. Ultimately the project turned out very well and works perfectly. Take your time. Adapt and overcome.
Your encouragement worked, it was so nerve wracking that I could only work on it for 20 at a time before taking a break. The Helios 2 1/2 is somewhat different so I will share in case any one needs to do it in the future.

The tube is one piece but that is a whole brass bell shaped housing inside. It must be removed before the focus adjustment unit can be slided out. In hindsight I could possibly leave lens inside and try to pull the whole hosing out after removing a tiny screw.

The reticle elevation part is different, it is just a dove tail and the reticle just slides up and down within. It does not get lifted up neither, instead, the will slide forward and come out from the front. One of the two screws holding the adjustment knob housing down also holds the reticle unit in place and must be removed before the unit can be slided out.

The inside had a little oxidation that prevent parts to slide out of the tube so I had to use penetrating oil and let it sit for an hour. I ended up tapped the claw rings lightly with a piece of wood to slide the bits out as there was no where to grab onto the parts.

If I have to do it again it would take 30 min but trying to do it blind was scary yet very satisfying at the same timeScreenshot_20220818_200410.jpgScreenshot_20220818_200403.jpgScreenshot_20220818_200357.jpgScreenshot_20220818_200352.jpgScreenshot_20220818_200349.jpg
 

Attachments

  • Screenshot_20220818_200343.jpg
    Screenshot_20220818_200343.jpg
    337 KB · Views: 5
Very cool, congratulations. It was late last night and years had passed since my project.
Your reticle assembly is very much like mine and my description of its disassembly was incorrect. It is very satisfying to accomplish!
 
Very cool, congratulations. It was late last night and years had passed since my project.
Your reticle assembly is very much like mine and my description of its disassembly was incorrect. It is very satisfying to accomplish!
Very cool, congratulations. It was late last night and years had passed since my project.
Your reticle assembly is very much like mine and my description of its disassembly was incorrect. It is very satisfying to accomplish!
All good, at least you gave you something to start so much much appreciated. Quick question, did you lube the parts afterwards? I know they say don't add oil in a scope but how do you keep the lube and other steel bits inside from rusting?
 
The bits inside don’t need much lubricant if any. They are for the most part brass or brass on steeI. With the bluing process, my tube was submersed in boiling water a dozen times. I ran steel wool then a clean rag through the tube, cleaned the lenses that were easy to service with alcohol and a lint free cloth and put it back together.
 
Last edited:
There arent too many threads out there on scope work. As a watchmaker it interested me quite a bit and I've had success rebuilding old German optics. I've refurbished tubes, recemented lenses, fixed reticles, regreased etc about a dozen scopes and I don't think I'll ever do it again. Things go wrong so so fast . That sigh of relief after disassembly is undeserved. Putting it back together is always infinitely harder, especially with dented or rusted tubes. The smallest nick on the interior of the scope can make reassembly impossible.

I'll never forgive myself for ruining a beautiful Zeilsechs so I wont do it anymore. Sure, I'll clean and regrease a turret or two but I wont remove scope insides ever again. My best advice to you would be to never force anything, build the correct tool for the job, and use the correct optical damping grease.

Since I've hung up my hat I've had good success sending German optics to Erik at Mountain Optics and Mike at Iron Sights. Although neither will rebuild post reticles.

Here are a few threads I've come across in my research that were helpful in my work.

Thank you for the links, I wouldn't have found the French ones if it weren't for you.

The one about using coper tube to push it back is great advice
 
Don't forget to get some light grease film inside the complete tube by reassembling to catch free dust and dirt by using and shooting the scope.
 
So I heated the rings up and they came off with very little effort. The solder material was a different story, I didn't know how to get it off so I ended up heating it up and rubbing on card board repeatedly to get as much as possible off.

To put it back was ok. I cleaned the inside with a 12ga bronze brush and ran a extremely lightly oiled rug inside to prevent rusting. Once cleaned up the bits can be moved in place buy tapping the tube on a piece of leather lightly. First was the across hair unit, I made a mistake of wrapping it in cotton cloth for storage so I have a lint on the cross hair now.

The knob was installed, followed by the brass focusing unit, I tapped it until it lined up with the adjustment slot, could have been easier if I hollow out a wood dowel and insert from the front (before cross hair adjustment unit was installed). I also made a mistake by installing it backwards so had to redo the whole lot (I placed it wrong when I took reference pic two weeks ago).

Followed by screwing in the front and rear assembly (the rear assembly is contained in a brass housing, held in place by a tiny screw, you don't have to get the lens off the brass housing like I initially did), now it's done!

May be someone will find is useful one day.

My Vector Optics repro rings are coming tomorrow, I will report back. Bought a set for $90 plus $19 shipping (it's actually shipped on DHL) as they were running promotion. Initially I ordered a set for $130 else where but the seller pulled a doggie on me and said it was not free shipping and asked me to pay $45 extra so I cancelled and ordered else where.
Screenshot_20220829_123835~2.jpgScreenshot_20220829_124005.jpgScreenshot_20220829_123931.jpg


Screenshot_20220829_123835~2.jpgScreenshot_20220829_124005.jpgScreenshot_20220829_123931.jpg
 
Last edited:
Excellent thread, photos and description of work! Thanks. I would really like to read how you (or anyone) synchronizes or calibrates the reticle movement with the elevation dial?
 
Excellent thread, photos and description of work! Thanks. I would really like to read how you (or anyone) synchronizes or calibrates the reticle movement with the elevation dial?
I will update once I install it. I don't even know where the parallax is set at, thinks it's about 300 meter but I need to test it at place of known range.
 
So the vector Optics high turrets arrived, they appear to be solidly built but and very tight very I can't tell till I have Screenshot_20220830_185935.jpgScreenshot_20220830_185941.jpgScreenshot_20220830_185356.jpgdrilled and tapped and take it on and off a few times. The rings are not historically correct but I am not soldering another set of half ring back on. If things go well and the finished package runs well I may eventually modify the bottom halves of the split rings into half rings and solder on
Screenshot_20220830_185935.jpg
 

Attachments

  • Screenshot_20220830_185949.jpg
    Screenshot_20220830_185949.jpg
    350.1 KB · Views: 1
Back
Top