You are using an out of date browser. It may not display this or other websites correctly.
You should upgrade or use an alternative browser.
You should upgrade or use an alternative browser.
Yugo M48 DMR build - recommendations needed
- Thread starter djrpm
- Start date
Sure can contact Eric Johnson vaughn99@roadrunner.com
I just had my project finished about a week ago - turned out well and he took more time and did nicer work than many originals (usually heavily modified the bases for scope clearance or placed the mounts so you could not use stripper clips when the scope was off etc). Sadly, my guy is north of the border but it cost me 1hour of work $127.00 CDN for the work.
Attachments

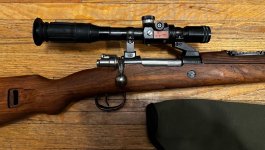
Find some pictures online for your gunsmith to reference, so he completes the work in the manner you would like.I just had my project finished about a week ago - turned out well and he took more time and did nicer work than many originals (usually heavily modified the bases for scope clearance or placed the mounts so you could not use stripper clips when the scope was off etc). Sadly, my guy is north of the border but it cost me 1hour of work $127.00 CDN for the work.
GS455
Well-known member
I think he said the project was finished. Was there something his gunsmith didn't complete?
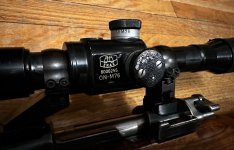
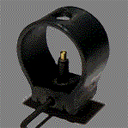
That's an interesting variant of the onm76 scope. I don't think I've seen that before. What's the exact model number?
How did you deal with the hump on the rear receiver bridge? I just shimmed the back half of mine.
I think I paid $200 for mine many years ago and sat in the safe slathered in cosmoline. After I finally stripped and cleaned it, it was in virtually mint, non-issued condition. While I have been able to hit 400 yd steel plates the second stage pull on mine is horrendous. I think it's near 6 lb. I'm actually going to try putting a Huber trigger in it this weekend. I'm very optimistic of what this rifle will be capable of.
Unfortunately my mounts are probably ever so slightly off. I've tried two different ONM76 Scopes and both of them end up with the reticle a bit left in field of view.
Last edited:
Do you have any close ups of the shims?I think he said the project was finished. Was there something his gunsmith didn't complete?
That's an interesting variant of the onm76 scope. I don't think I've seen that before. What's the exact model number?
How did you deal with the hump on the rear receiver bridge? I just shimmed the back half of mine.
I think I paid $200 for mine many years ago and sat in the safe slathered in cosmoline. After I finally stripped and cleaned it, it was in virtually mint, non-issued condition. While I have been able to hit 400 yd steel plates the second stage pull on mine is horrendous. I think it's near 6 lb. I'm actually going to try putting a Huber trigger in it this weekend. I'm very optimistic of what this rifle will be capable of.
Unfortunately my mounts are probably ever so slightly off. I've tried two different ONM76 Scopes and both of them end up with the reticle a bit left in field of view.
GS455
Well-known member
The front/bottom shim needed some grinding with a Dremel to fit the M48 and I am on the fence about sanding the barrel channel on the stock and upper hand-guard to "float" the barrel with the included cork. Waiting on John Huber to help me fit his adjustable trigger to my barrel/bolt action. After all settles into place I may hone out the inner barrel channel as well. Maybe later.
Milsurp Accuracy Inc. Brian Rau. Great guy. Very helpful via email. https://www.milsurpaccuracyinc.com/
I've already shimmed my PU Snipers with his kits as well. Looking forward to getting to the range.


Milsurp Accuracy Inc. Brian Rau. Great guy. Very helpful via email. https://www.milsurpaccuracyinc.com/
I've already shimmed my PU Snipers with his kits as well. Looking forward to getting to the range.
Last edited:
GS455
Well-known member
Yugoslavia M48 Sniper Rifle
Picture page and research information on my Yugo M48 Sniper rifle used during the war in Bosnia.
GS455
Well-known member
I just read through this again. I'm sorry, were you looking for pic of the shim under the rear mount? I posted pictures of the acurizing kit shims for the actionDo you have any close ups of the shims?
Yes, the shims under the rear mount. However, I did save the link to the other shims as well. When I get some extra cash and time away from the kids, this is my next project!I just read through this again. I'm sorry, were you looking for pic of the shim under the rear mount? I posted pictures of the acurizing kit shims for the action
GS455
Well-known member
Okay, traveling now but will snap a pic of it this weekend. It really just looks like a thin piece of metal (could just be cut out of a soda can) under the rear base.
Update on the Huber Concepts "Black Teflon Service Match" trigger. . . . .
. . . . it took a bit to tweak and fit into proper adjustment (with John's very willing assistance) but in the end it's just remarkable. I didn't have to inlet my stock as indicated on his websight which is nice and I don't know if the rifle would qualify for official sanctioned military match shooting but as a plinker I couldn't be happier. I'm presently dealing with the fact that I cannot separate the movement of my ONM76's top turret and drum for zero'ing so I haven't fired for groups yet but the feel and action of the rifle are miles beyond "as issued"
And speaking of triggers; if anyone is interested in giving their Mosin PUSniper a major upgrade beyond the shim kits mentioned above you'll want to check out Joshes adjustable 91/30 triggers. Simply an exceptional upgrade to the nasty stock trigger on these as well. . . . .
 smith-sights.com
Update on the Huber Concepts "Black Teflon Service Match" trigger. . . . .
. . . . it took a bit to tweak and fit into proper adjustment (with John's very willing assistance) but in the end it's just remarkable. I didn't have to inlet my stock as indicated on his websight which is nice and I don't know if the rifle would qualify for official sanctioned military match shooting but as a plinker I couldn't be happier. I'm presently dealing with the fact that I cannot separate the movement of my ONM76's top turret and drum for zero'ing so I haven't fired for groups yet but the feel and action of the rifle are miles beyond "as issued"
And speaking of triggers; if anyone is interested in giving their Mosin PUSniper a major upgrade beyond the shim kits mentioned above you'll want to check out Joshes adjustable 91/30 triggers. Simply an exceptional upgrade to the nasty stock trigger on these as well. . . . .
Smith-Sights: Adjustable, high-impact sighting systems for your Mosin-Nagant!
Riflemen are often frustrated by the Mosin-Nagant's lack of fully adjustable sights. Smith-Sights is your top leader in sighting solutions for the Mosin, allowing you to regulate your Mosin's point of impact to your preference!
smith-sights.com
Raupleminze
Senior Member
That looks a lot like the shim kit I offer online.The front/bottom shim needed some grinding with a Dremel to fit the M48 and I am on the fence about sanding the barrel channel on the stock and upper hand-guard to "float" the barrel with the included cork. Waiting on John Huber to help me fit his adjustable trigger to my barrel/bolt action. After all settles into place I may hone out the inner barrel channel as well. Maybe later.
Milsurp Accuracy Inc. Brian Rau. Great guy. Very helpful via email. https://www.milsurpaccuracyinc.com/
I've already shimmed my PU Snipers with his kits as well. Looking forward to getting to the range.
View attachment 335881View attachment 335882View attachment 335883
GS455
Well-known member
Where can we find your kits on line?That looks a lot like the shim kit I offer online.
Raupleminze
Senior Member
Milsurpaccuracyinc.comWhere can we find your kits on line?
Raupleminze
Senior Member
YepAre you Brian Rau?
GS455
Well-known member
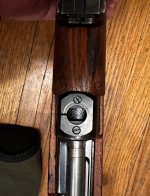
Finally got a pic for ya. Looks like a thin piece of aluminum folded over once (if you zoom in). Can't see it on the other side.Yes, the shims under the rear mount. However, I did save the link to the other shims as well. When I get some extra cash and time away from the kids, this is my next project!
Attachments
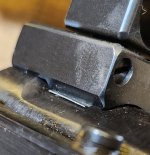
Thanks. So you didn’t add any solder under the bases then? Did you just use screws with any thread locker (purple loctite)? I have also read some folks having issue with the rear ring being loose after it’s clicked into the base. Do you have any issues with that?Finally got a pic for ya. Looks like a thin piece of aluminum folded over once (if you zoom in). Can't see it on the other side.