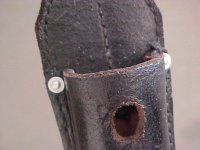
Fellow collectors, I am sure many of you are frustrated with German frogs from which one or more rivet retention washers (and/or the rivets as well) have gone missing. The culprit is typically a weak or inadequate rivet head crimp, which eventually allows the retention washer to pop off. For those of you whom are up to the challenge, here is the work-around I use when the need arises...
#1. What you will need:
Since the original components are metric, here in the USA you are going to end up using SAE (inch) material. Nearly all specifications I mention are in 100ths of an inch (taken with a micrometer). Aluminum alloy rivets and washers are available. Washers can be formed from a snip of raw sheet stock if unavailable. Some frogs used steel, brass or even copper rivets & washers. Although the process is the same to replace a rivet & washer, brass & copper components might have to be made or modified from screws, rods, tacks, etc. What follows is a optimal set of tools to perform the work, but often a few simple ones may suffice:
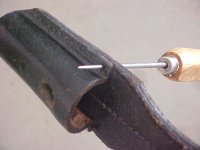
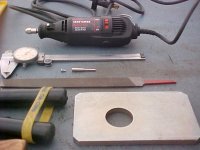
a. Dremel or other rotary tool with chucks, etc. The Dremel shaft & screw which supports the cut-off wheel, etc. is too small to hold the washer and will cause it to spin off center. The one I have pictured has a thicker shaft & screw, which only has a small bit of play in it. This allows the washer to be secured solidly to about 98%+ on-center. It will make turning down the washer a much easier and accurate task.
b. Medium & smaller brass hammer.
c. Set of pin punches,
d. Needle-nose pliers. These are good to hold the rivet if you need to file down the shaft a bit and add the bevel.
e. Medium sized, fine file or selection of files.
f. Small, solid piece of steel plate or very hard wood. You will use this surface to peen the rivet on. Thickness should be .250 inch minimum.
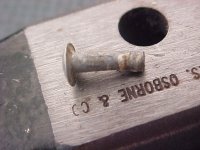
g. Rivet set or specific steel peening tools (use of a rivet "hand-squeeze" tool with flat & concave sets, is another option). Note the rivet-setter tool lying right of center (photo #4). On the face of it are two depressions. The larger, concave one is used to peen down the end of the rivet. The smaller one matches the diameter of the rivet shaft and slides down over it to either compress the leather or washer and leather.
h. Ice pic.
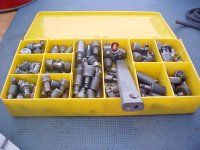
i. An appropriate rivet and accompanying washer (to be trimmed/sized based on requirements).
j. Leather treatment like Ballistol.
k. Patience.
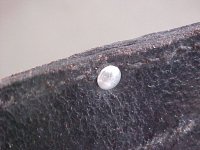
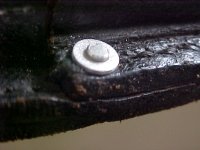
Below are pictured the various tools. The second photo is of the frog and material to be worked (I used the large washer as smaller was steel). Original rivet is in the last photo, sitting on peening tool I used.
CONTINUE ONTO THE NEXT POST FOR PART 2 OF THE PROCEDURE...
#1. What you will need:
Since the original components are metric, here in the USA you are going to end up using SAE (inch) material. Nearly all specifications I mention are in 100ths of an inch (taken with a micrometer). Aluminum alloy rivets and washers are available. Washers can be formed from a snip of raw sheet stock if unavailable. Some frogs used steel, brass or even copper rivets & washers. Although the process is the same to replace a rivet & washer, brass & copper components might have to be made or modified from screws, rods, tacks, etc. What follows is a optimal set of tools to perform the work, but often a few simple ones may suffice:
a. Dremel or other rotary tool with chucks, etc. The Dremel shaft & screw which supports the cut-off wheel, etc. is too small to hold the washer and will cause it to spin off center. The one I have pictured has a thicker shaft & screw, which only has a small bit of play in it. This allows the washer to be secured solidly to about 98%+ on-center. It will make turning down the washer a much easier and accurate task.
b. Medium & smaller brass hammer.
c. Set of pin punches,
d. Needle-nose pliers. These are good to hold the rivet if you need to file down the shaft a bit and add the bevel.
e. Medium sized, fine file or selection of files.
f. Small, solid piece of steel plate or very hard wood. You will use this surface to peen the rivet on. Thickness should be .250 inch minimum.
g. Rivet set or specific steel peening tools (use of a rivet "hand-squeeze" tool with flat & concave sets, is another option). Note the rivet-setter tool lying right of center (photo #4). On the face of it are two depressions. The larger, concave one is used to peen down the end of the rivet. The smaller one matches the diameter of the rivet shaft and slides down over it to either compress the leather or washer and leather.
h. Ice pic.
i. An appropriate rivet and accompanying washer (to be trimmed/sized based on requirements).
j. Leather treatment like Ballistol.
k. Patience.
Below are pictured the various tools. The second photo is of the frog and material to be worked (I used the large washer as smaller was steel). Original rivet is in the last photo, sitting on peening tool I used.
CONTINUE ONTO THE NEXT POST FOR PART 2 OF THE PROCEDURE...
Attachments


Last edited: